2. Sous Vide Hardware
Sous
vide cooking requires very little in the way of hardware: a heater to keep the water bath
at temperature, and a vacuum sealer to package foods so that they can be placed in the
water bath without coming into direct contact with the water. While the commercial tools
can still set you back many hundreds of dollars, a DIY version can easily be made for less
than $100, and resealable plastic bags can be used in lieu of a standard vacuum
system.
2.1. Water heaters
One difficulty of sous vide cooking is maintaining a water bath at a precise
temperature, +/– 2°F / 1°C. The early days of sous vide cooking used laboratory
equipment designed to hold water baths at the precise temperatures needed for
controlling chemical reactions, but as you’d imagine, the lab gear has the drawback of
being expensive. We’re right on the cusp of a wave of new products targeted at the home
chef who wants to cook sous vide, and while the prices might still be out of your reach,
they’ll surely come down until at some point the “three-in-one rice cooker” (steamer and
slow cooker, too!) will become a four-inone rice cooker.
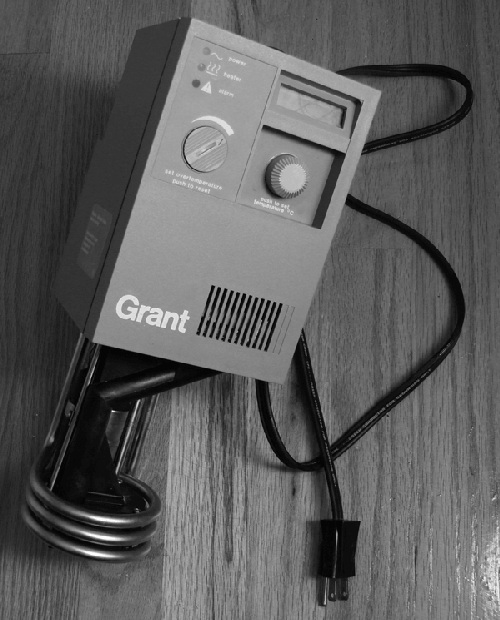
Industrial circulators. These are lab-grade units
that either are designed to be submerged into a container of water (e.g., hotel pans) or
are enclosures with built-in containers. PolyScience is the most common manufacturer
(http://www.cuisinetechnology.com), with new
units costing around $1,000. Grant is also a common maker (http://www.grantsousvide.com). With luck, you can pick up a used
unit at an online auction site for considerably less, but be aware that you’ll have no
idea what chemicals or pathogens a used unit might have been exposed to. If you do go
this route, a three-step wash seems to be the standard cleaning regimen suggested: run
it in a bath of vinegar, then one of bleach, and finally one of rubbing alcohol.
Consumer sous vide products. With the popularity
of sous vide rising, a number of consumer products have recently been released or are in
development that bring the cost of the hardware down to the $400 range, such as the Sous
Vide Supreme. While still on the expensive side, as a piece of consumer kitchen
equipment, it’s not unreasonable, and prices will inevitably fall. Given the versatility
and usefulness of the cooking technique, definitely consider looking at this category of
products.
DIY sous vide. Other commercial products supply
the “sous vide logic” but are BYOHS (bring your own heat source). Appliances like slow
cookers contain the necessary cooking parts already: they hold a reservoir of liquid,
have a heating element, and are designed to run for extended periods of time. You can
repurpose them for sous vide cooking by adding an external controller that switches the
slow cooker on and off to keep it near a target temperature. See the sidebar on making
your own sous vide rig for details.
If you’re the type inclined to fiddle
with electronics, you can build your own sous vide rig by ordering a few parts online
and spending a few hours tinkering. The actual electronics necessary to maintain a water bath at a set temperature are
simple enough: a basic slow cooker, a thermocouple, and a simple thermostat controller
to switch the heat source on and off. First, the slow cooker. The slow cooker will
serve as the brawn, holding the water and providing the heat source. Snag a cheap slow
cooker—you need one that will turn back on after losing power. Look for one that has a
physical knob; the digital ones reset and stay off after power has been cut and then
restored. 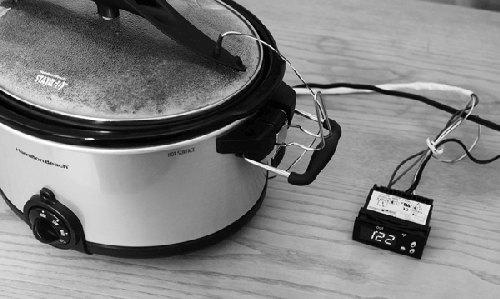
Next, the thermocouple. If you have a standard
kitchen probe thermometer (which you really should), the probe—long braided cable,
metal probe—is a thermocouple. For a sous vide rig, you’ll need a type J thermocouple,
which is made of materials that give it good sensitivity in the temperature ranges of
sous vide cooking. This should cost around $15 to $20; search online for “type J
probe” or search for part 3AEZ9 on on http://www.grainger.com. Finally, the temperature controller. Just about
any thermocouple-based temperature switch will work; look for one that runs off 12
volts DC, such as Love Industries’ TCS-4030, which runs about $75. Snag a 12-volt wall
wart (AC/DC power adaptor) while you’re at it. Once you have all the parts on hand, it’s a relatively straightforward procedure
to perform the lobotomy on the slow cooker: hook the thermocouple up to the probe
inputs on the switch and connect the 12-volt power supply to the switch, then snip the
slow cooker’s electrical cord and run one side of it through the switch. Create a
small hole in the lid of the slow cooker and poke the thermocouple through. Make sure
you use enough water in the slow cooker that the thermocouple makes contact with the
water when the lid is on! 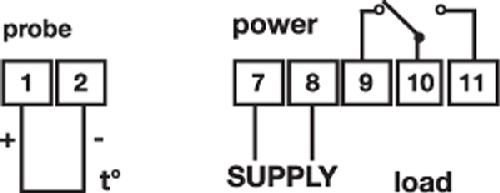
|
2.2. Vacuum packers
Regardless of what type of vacuum packer you use, make sure that the plastic bag
you’re using is heat-stable.
Commercial in-chamber vacuum sealers. The
industrial vacuum sealers create a (mostly) air-free chamber (a true vacuum).
Unfortunately, they cost thousands of dollars. Fortunately, you don’t need one. While
there are a number of handy applications for them (mmm, watermelon
steak), sous vide doesn’t require this level of vacuum seal.
Consumer vacuum food sealers. These devices suck
the excess air out of a plastic bag and then seal the bag by means of melting and fusing
the opening of the bag. They don’t create a true vacuum (in the sense that the food
isn’t subjected to a reduction in atmospheric pressure), but they do pull out most of
the excess air. This is perfect for sous vide, because the function and purpose of the
bag is just to allow rapid heat transfer from the water bath to the food via convection
currents. Air in the bag would both slow the rate of heat transfer and also cause the
bag to float in the water, preventing the face-up side of the bag from absorbing
heat.
Resealable plastic storage bags. Sealable
sandwich and storage bags (e.g., Ziploc bags) are not safe for
boiling food. The concern with boiling applications is the
potential for the plastic to leach into the food. The melting point of the type of
plastic used in these bags is only a few degrees higher than the boiling point of water.
BPA (bisphenol A) contamination would also be of concern, especially if you are adding
oils inside the food. Check to make sure the manufacturer of the bags you have does not
use BPA.
Note:
SC Johnson, the manufacturer of Ziploc-branded bags, does not use BPA.
Sous vide cooking, however, does not boil the water. 170°F / 75°C is about the
highest temperature you might use in sous vide applications; 140°F / 60°C is about the
warmest that’s commonly encountered. Is 170°F / 75°C safe? SC Johnson is on record
claiming that, yes, “[Ziploc] bags can be safely heated to 170 degrees Fahrenheit
[76°C].”
Remember, the function of the bag is to allow heat to pass quickly from water to
food via convection, so if you do use a plastic bag, make sure to remove as much air as
possible. You can submerge most of the bag, leaving just the sealing strip at the top
above water, and then seal it. Adding a bit of olive oil or marinade helps, because
it’ll better conform to the shape of the food.
How did you hear about sous vide, and how did you get
involved in it?
I was reading an article in the New York Times by Harold
McGee, and he mentioned sous vide. While I knew quite a bit about cooking, I had never
heard the term before and was intrigued. So I did what any good geek does: I went to
Google and did some research. There was some information but not enough to meet my
curiosity. So I turned to the academic journals and found a wealth of
information.
It took me three or four months to collect and distill the 300 or so journal
articles I found and publish the first draft of my guide online. I also did some
calculations to figure out how long it takes things to cook and how long it takes to
make them safe.
Safety is one of the big topics that comes up with sous
vide and I’d love to talk about that in a moment. But first, what turned out to
matter more than you expected when cooking sous vide?
People always worry about the vacuuming process, but that’s really the least
important part, even though the name sous vide means “under vacuum.” It’s really the
precise temperature control that is important.
Long-term precision is important, because you don’t want slow drifts when you’re
cooking for days to cause your meat to be overcooked. But short-term fluctuations in
temperature really aren’t that important because they will only affect the very outer
portion of the meat. As long as the heat is oscillating less than one or two degrees
Fahrenheit and the mean temperature is constant, you should be fine.
Wow! Cooking meats for days? What sorts of meats actually
need cooking for that length of time?
Well, my favorite is beef chuck roast cooked for 24 hours at 130°F / 54.4°C. It’s
delicious. It transforms one of the least expensive cuts of beef into something that
looks and tastes like prime rib.
It’s all about the conversion of collagen into gelatin. This conversion is pretty
rapid at higher temperature, taking only 6 to 12 hours at 175°F / 80°C to completely
convert everything—well, almost everything. But at lower temperatures like 130–140°F /
54.4–60°C, it can take 24 to 48 hours for the same conversions to occur.
When I look at something like
brisket being cooked at 130°F / 54.4°C for 48 hours, alarm bells go off in my head.
Isn’t there a potential bacterial risk here?
Well, certainly there’s no risk at 130°F / 54.4°C. The pathogen that determines
the lowest cooking temperature is Clostridium perfringens. Its
highest temperature reported in literature is 126.1°F / 52.3°C. So as long as you’re
above that temperature, there won’t be any food pathogens growing.
Now, there is the possibility of spoilage or beneficial microorganisms growing at
these lower-cooking temperatures. That’s one of the reasons that some people will sear
ahead of time or drop the package of vacuum-sealed food in a pot of boiling water for
a couple of minutes to kill off any thermophilic microorganisms that might be in
there, like lactobacilli. But, in terms of safety, there’s no concern
whatsoever.
How about things like salmon, which are cooked at even
lower temperature ranges than 130°F / 54.4°C?
If you would be fine eating the salmon raw, then cooking it for a couple of hours
at a very low temperature, say 113°F / 45°C, isn’t going to be a problem. If you
wouldn’t be comfortable eating it raw, then you probably shouldn’t be cooking it at
anything less than pasteurization temperatures and times.
Most food scientists and food safety experts agree that you should pasteurize
fish. Even though it may not taste the same, or possibly quite as good, at least
you’ll feel a little more safe.
Food safety is about controlling both the actual and the perceived risk. Many
people perceive the risk of fish to be much less than the risk of pork, but in many
ways it’s probably the other way around.
In our modern agro-industrial complex, we don’t really know where things come
from. With this decrease in knowledge of where our food came from, what field, how it
was processed, and how it finally gets to our table, I tend to take the attitude of
“pasteurize everything and hope for the best.” Though it may not be what everyone
wants or likes to hear.
What are the risks and what can somebody in the kitchen do
to partially mitigate those risks?
When you’re trying to deal with food safety, especially when it comes to
pathogens, it is about three things. First, starting with a low initial level of
contamination, which would mean buying, for example, very good and very fresh fish for
which you know the origin. The second is to prevent the increase in the level of
contamination and is frequently accomplished with cold temperatures or acids. The
third is reducing the level of contamination, usually by cooking.
The problem is that if you’re cooking fish sous vide at only 113°F / 45°C, then
you won’t reduce the pathogens to a safe level. So either pasteurize your fish by
cooking it at 140°F / 60°C for about 40–50 minutes or make sure that very few
pathogens grow and that the fish has a very low amount to begin with by buying from a
trusted source.
Can one reduce the level of parasites by
freezing?
Parasites, certainly. Though freezing fish at home will affect the quality of
fish, because consumer freezers just can’t freeze the fish fast enough to prevent
large ice crystals from forming. Now, it’s completely possible that you can buy
already frozen, high-quality fish, or simply find out from your fishmonger whether or
not it has already been frozen for a sufficient amount of time to kill any
parasites.
But freezing won’t kill the different bacterial food pathogens that one might be
concerned with, and there’s always the concern of chemical contamination, especially
with shellfish that are harvested from questionable waters.
How do you know if something will work when you go to sous
vide it?
I never really know, but I like to really scour the research journals for clues to
the underlying processes involved. I first look to see if anyone else has already done
it. With the wealth of scientific knowledge now available to us through the Internet,
it’s very likely that someone has asked and answered a closely related question. Then
I just try and adapt it to the home kitchen.
It always surprises me how often I can take things directly from an academic
journal and apply them in the kitchen.