When
planning a kid’s birthday party I find the simplest option is usually
the best. To streamline the party organisation and keep it simple, I use
a 10-point birthday party plan. A 10-point plan might sound complex and
work-heavy, but all it does is define the work involved and put it into
manageable chunks. Part of the fear of organising a party can be not
knowing where to start. This 10-step plan tells you where to start and
what to do next. You need to prepare:
• an overall family birthday party strategy
• a party theme
• the invitations
• the guest list
• the food and drinks list
• a games or activities plan
• the lolly/treat bags
• your party week and party day work schedules
• an emergency plan
• thank-you cards.
Step 1: Overall family birthday party strategy
Two
of our children have birthdays within 10 days of each other in April.
The remaining three are at the other end of the year, with one at the
end of November, one in mid December and our youngest child’s birthday
after Christmas. It’s been jibed at me that for someone who loves to
plan I didn’t do such a great job of planning my children’s arrivals in
this world. There are some things that you just can’t plan!
Prior to the birth of
our fourth child I realised that the way we’d been celebrating birthdays
was not sustainable. Being such an enthusiastic mum and wanting parity
for the younger children, I’d created an expectation in my kids that
they’d have a big party every year. Every year that I gave each child a
party I reinforced the expectation. Having a large party every year was
not only too expensive for us, but due to the clustering of the kids’
actual birthdays, it was physically exhausting for me to have to prepare
multiple parties.
My husband and I
decided to bring the issue of birthday parties up at a family meeting.
We gave the kids prior notice that we’d be discussing parties and asked
them to think about how we could celebrate birthdays in the future. With
input from the kids, we managed to come up with a solution everyone was
happy with. The older boys both thought that having a party every
second year would be a good idea, so this formed the basis for the
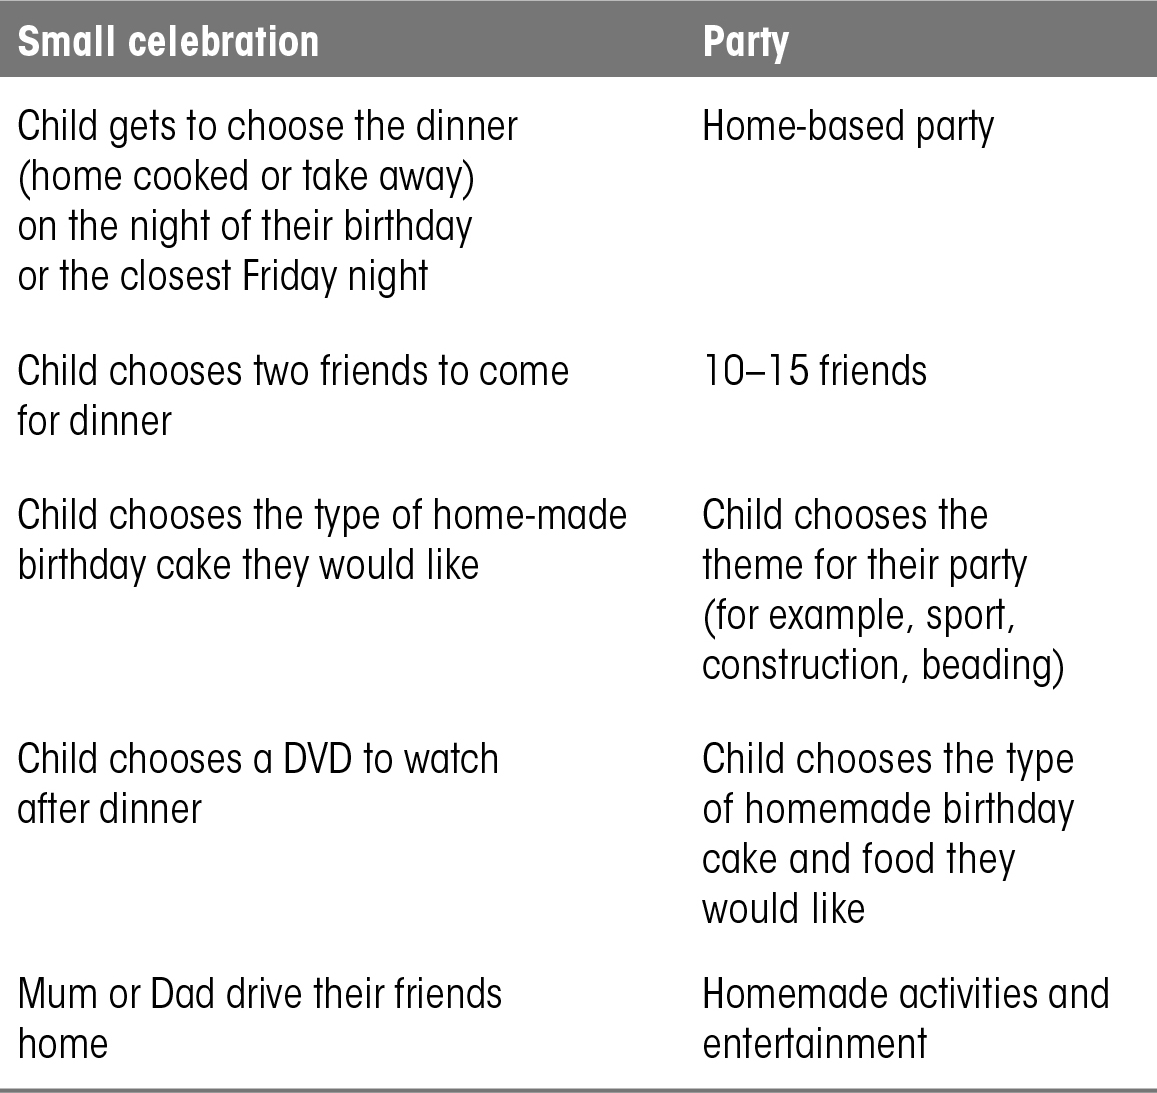
birthday-party rotation strategy shown in table 1: one year they
would have a small celebration, followed the next year by a home-based
party. For example, in the year when one of the April children and the
early December child have a party, the other two have a small
celebration.
Table 1: birthday party rotation
Now
all the kids are clear about what they can expect each year for their
birthday. From my perspective, it’s smoothed out my birthday party
workload and reduced our costs. As the children get older and move on to
secondary school we’ll review it again to make sure we continue to have
suitable ways of celebrating birthdays.
Step 2: Party theme
Once you’ve chosen a theme, other decisions such as games, the food and the cake become
easier because you can align them to the theme. I recommend keeping the
theme simple, and if you want to keep the costs down I also recommend
avoiding ‘branded’ themes. You can easily address a child’s interest
with a generic equivalent, for example:
• Bob the Builder → construction
• Thomas the Tank Engine → trains
• Hannah Montana → singing and dancing.
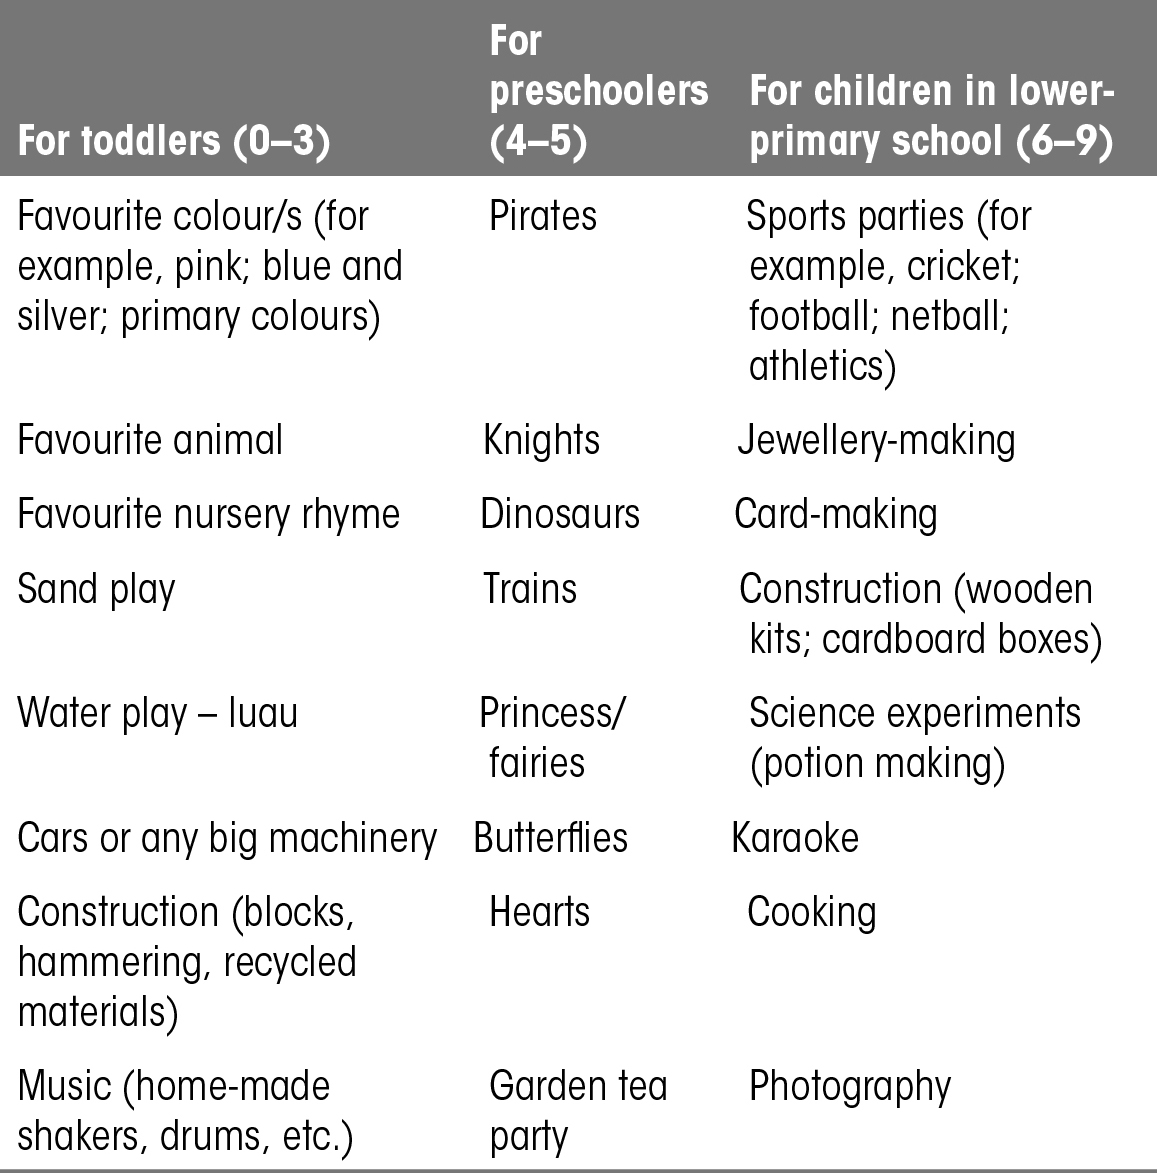
In
table 2 I’ve listed themes that we’ve used in the past, or themes
from great parties that we’ve attended to give you some inspiration.
Themes are listed by age group: some can cross over multiple age groups
and some themes could be used for all ages.
Table 2: birthday party themes
Step 3: Invitations
You can create a very simple invitation at home that’s inexpensive and involves the kids. Some styles we use frequently are:
• photo-based:
⇒ Use a recent photo as a centrepiece of the invitation.
⇒ Attach it to coloured card and write the party details on the back.
⇒ Decorate
it with items that reflect the theme — for example, pink dots.
Depending on the age of the child, they can help do this. (I try to keep
the children involved as much as possible in the party preparations.)
• theme-designed:
⇒ Make the base shape of the invitation fit the theme (for example, a football, shield, rocket, crown).
⇒ Use colours and wording to fit the theme.
⇒ Type the party details into a space that can be stuck onto the card.
⇒ Print out and attach this to the base shape.
• child-designed:
⇒ Have
the child draw a picture in Tux, Paint or another computer drawing
application. (Paint can be found under Accessories in the Start menu of
Microsoft.)
⇒ Insert the picture and add your words to a Word document.
⇒ Print this out and let the child cut out the design.
⇒ Paste it to coloured card.
⇒ Older
children can use more advanced programs such as PowerPoint to design
their own invitation on the computer and print it out for their friends.
Step 4: Guest list
Once we’ve decided who
we’re inviting, I type a list of names into a spreadsheet (although this
could also be a handwritten list). I then stick a copy of the list on
the wall near the phone. That way, if anyone takes an RSVP call about
the party, they can easily mark the response on the sheet.
Step 5: Food and drinks list
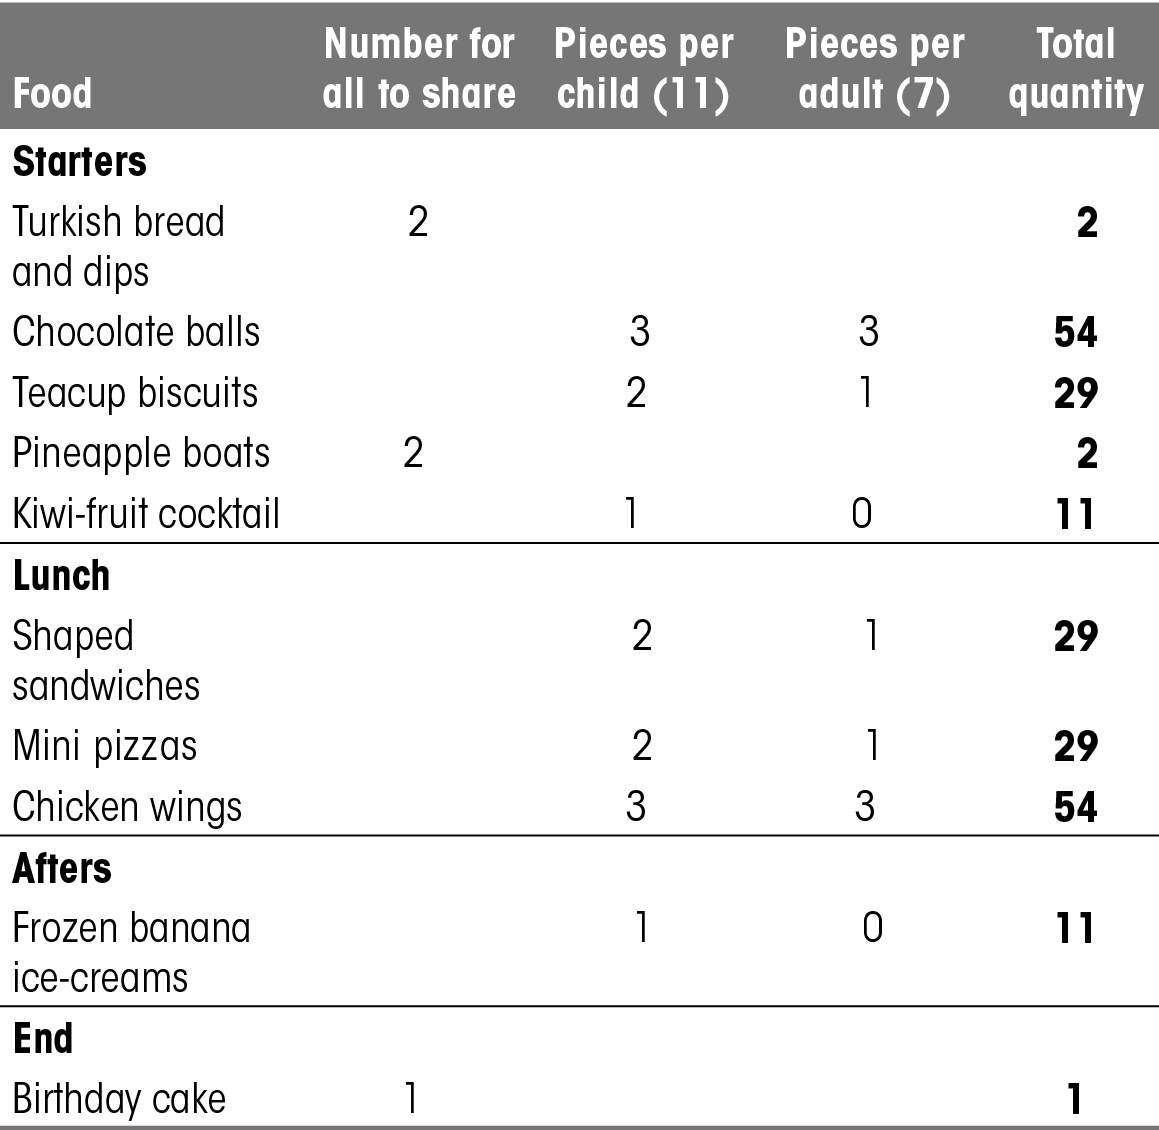
One
of the reasons I keep a guest list in spreadsheet form is so I can use
the numbers to calculate the quantities of foods we’ll need. I create a
food and drink list linked to the number of adults and kids who’ll be
attending. Then I can quickly determine the exact food requirements for
the party. I’m notorious for over-catering, so having a list to refer to
for quantities helps give me perspective. I can also quickly work out
by how much I need to multiply my recipes to work out how much food we
need, which makes shopping easier too. Table 3 shows an example of a
food and drinks list.
Aligning
the food with the party theme also makes decisions about what to serve a
bit easier. Here are some food (and set-up) ideas we’ve used for themed
birthday parties.
Table 3: food and drinks
• Knight theme — a long banquet table:
⇒ set up a long trestle as a banquet table
⇒ serve chicken wings and drumsticks, baked potatoes, corn on the cob and chunks of bread as the main food
⇒ use goblet-shaped cups for the children to drink from
⇒ make a lamington castle cake with lamingtons stacked like bricks, complete with turrets.
• Football theme — individual snack boxes:
⇒ cut up oranges
⇒ make or buy cheap snack boxes (I used cardboard meal boxes)
⇒ pack a hot dog, two meat pies, two sausage rolls, a serviette and a fruit juice into each meal box
⇒ add a few chocolate balls and a small chocolate mud cake to each meal box
⇒ sit outside on picnic blankets
⇒ bake a rectangular cake that looks like a football pitch, complete with little plastic football players.
• Water party theme — luau:
⇒ set up a low, long table that children can sit around
⇒ provide lots of fruit-based foods such as pineapple boats, fruit skewers and kiwi-fruit cocktails
⇒ make flower-shaped sandwiches, mini Hawaiian pizzas and chicken wings
⇒ make chocolate balls and roll them in coconut dyed pink and yellow using food colouring
⇒ make frozen banana ice-creams
⇒ serve a homemade berry ice-cream cake.
• Garden tea party:
⇒ set up a table and chairs outside; decorate the table with rose petals and leaves
⇒ use real china teacups, a teapot and sandwich plates
⇒ bake fairy cakes, teacup biscuits and sprinkled (hundreds and thousands) biscuits
⇒ make sandwiches cut into fingers and filled with chicken, cucumber and cheese; and ham and cheese
⇒ finish off with a cinnamon tea cake decorated with flowers.
A
great tip for serving food at a kid’s party is to use snack boxes.
Party-supply places usually sell these very cheaply. We’ve used
rectangular cardboard boxes (like the ones used for fish and chips), which cost about 12 cents each.
We
then spread out blankets either inside or outside (depending on the
weather) and all the children sit together to eat. Kids will sit calmly
for 10 to 15 minutes eating and chatting. There’s much less wastage as
kids actually eat the food because they’re all seated. Tidying up is
also incredibly easy. Scraps make their way to the rubbish bin and the
snack boxes can be put into the recycling bin. The blankets help keep all the crumbs off the floor, which means less cleaning up for me.
Step 6: Games or activities plan
Children
are very adept at creating their own fun, so for parties I like to have
a mix of structured activities and time for the kids to just play. The
activities and play differ for each age group and the type of party we
have.
One-to-three years old
For this age
group, I prepare an area where the children can play freely. I’ve found
that organising games for this age doesn’t work well as they’re still
finding the concept of sharing and turn-taking pretty difficult. Given age-appropriate
toys and props, children this age will explore, play and entertain
themselves quite easily. Adults need only to keep a watch on proceedings
and lead with examples of play ideas if the toddlers are unsure of what
to do.
For a three year old’s construction party we had the following materials set up for the kids:
• a
box containing recycled materials, masking tape, string and staplers
with which they could make a creation using their imagination
• real small-sized hammers, and nails (clouts, as they have bigger heads)
• chalk for drawing on the pavement
• buckets and paint brushes for water painting.
For the water-themed party for a two year old we set up:
• two little blow-up pools full of water and water-play toys such as funnels, jugs, scoops and buckets
• two
child-sized tables set up with tea sets for those children who didn’t
want to get into the pools but were happy to play with the water
• child-sized watering cans, so those who wanted to could walk around the garden and water the plants.
For a one-year-old primary-coloured theme party we:
• moved all the furniture to the sides of one room
• had
primary-coloured helium balloons tied to decorative weights around the
room; the balloons are a natural draw card for little ones
• provided toys such as mega blocks, little people, a tea set and balls and placed them in different corners of the room.
Four-to-six years old
This
age group is able to participate more cooperatively in games and
activities, but a combination of free play and structured activities
works best to ensure the party remains calm and happy. Lots of
high-energy boys and girls left to their own devices for too long can
cause a little bit of mayhem! Here are some games we’ve played at a
football-themed party.
• Upon
arrival, each child was asked to write their name and a number on a new
T-shirt with fabric crayons. We had bought three different coloured
T-shirts, so the children could easily recognise which team they were
in. We then ironed the print, which we covered with a cloth, and this
became their team T-shirt for the games and also their take-home gift.
• We played a round robin of 15-minute soccer games.
• Orange
breaks: as the kids play very hard, those who were sitting out and
watching the others play ate oranges and drank water to refresh
themselves.
• We also had penalty shoot-outs where the kids competed against my husband as the goalie!
Seven-to-nine years old
At
this age — depending on the number of children — you can set the
children up with a comprehensive activity aligned with the party theme.
At a jewellery party for a seven year old, for example, the kids could
make a collection of basic pieces to take home with them, such as:
• a braided wristband
• a lolly necklace
• a beaded bracelet.
Step 7: Lolly/treat bags
The type of lolly bag that we prepare for the partygoers depends on their age.
Kids under three
I try to avoid
confectionery, so for this age I find cute little boxes, bags or tins
that can be used as take-home gifts and I place small treats in them,
such as tiny teddies, toddler fruitbars or homemade cookies.
Kids over three
By
this age I can no longer get away with a healthy treat bag so I allow
the kids to make some decisions about what they’d like in their lolly
bags. I try to encourage them to include a small theme-aligned trinket
and only a few lollies.
You
can use either brown paper bags or small cardboard noodle boxes to put
the lollies in. This is a great way to have children involved in
preparing for their party. The children can help decorate the boxes or
bags using the party’s theme for inspiration. The night before the party
I let them fill the bags or boxes themselves — after showing them an
orderly process for doing this — and they love it.
Step 8: Party week and party day work schedules
Having
a work plan helps me make decisions about such things as the type of
food I’ll serve. If I need to make some of the food the night before, I
may choose an ice-cream cake, which can be made in advance. This means I
don’t have too many things to do the night before or the day of the
party.
We
almost always have home-made ice-cream cakes at our home parties. They
are easy to make and customise with the birthday child’s favourite
ingredients. By scooping into cones to serve, there are no plates to
wash up and far fewer crumbs!! You do have to make sure there’s enough
for the adults too!!
Party week schedule
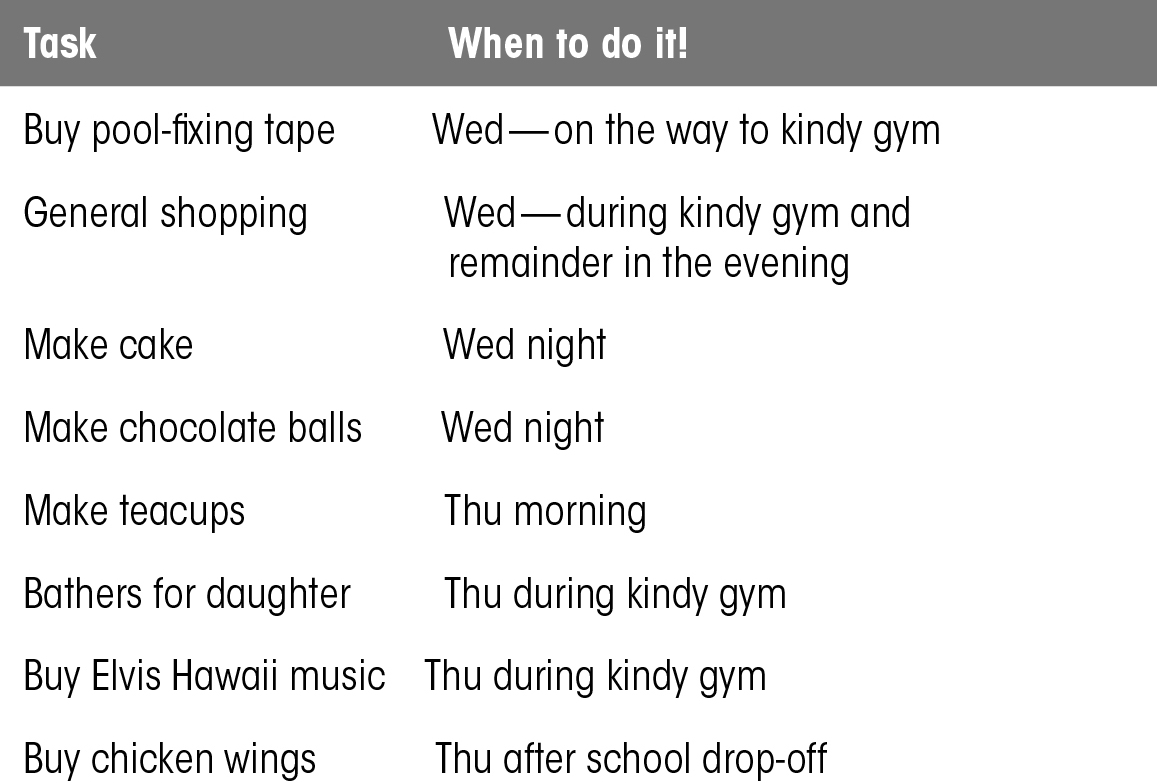
About a week before
the party, I write down everything I need to do over the coming days and
I spread the tasks out so that all the work isn’t left to the day
before the party. This prevents a repeat performance of times when I
left everything to the last minute and ended up going to bed at 2 am on
the day of the party. Just having the list makes me feel more organised
as I know what I need to do and when. Table 4 is a list of what and
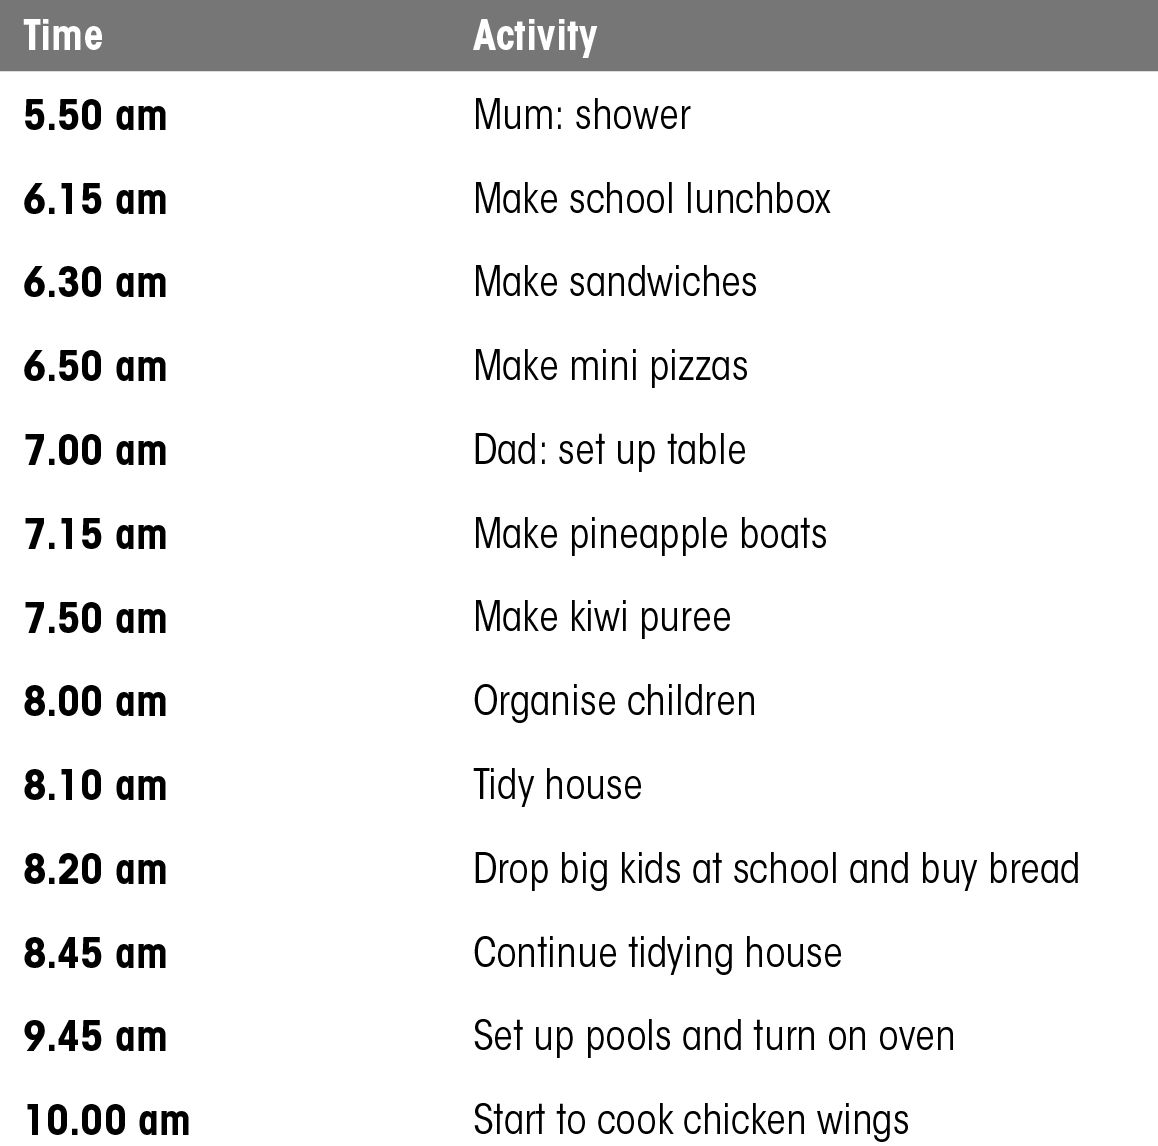
when things had to be done for our two-year-old daughter’s
water/luau-themed party.
Table 4: party week schedule

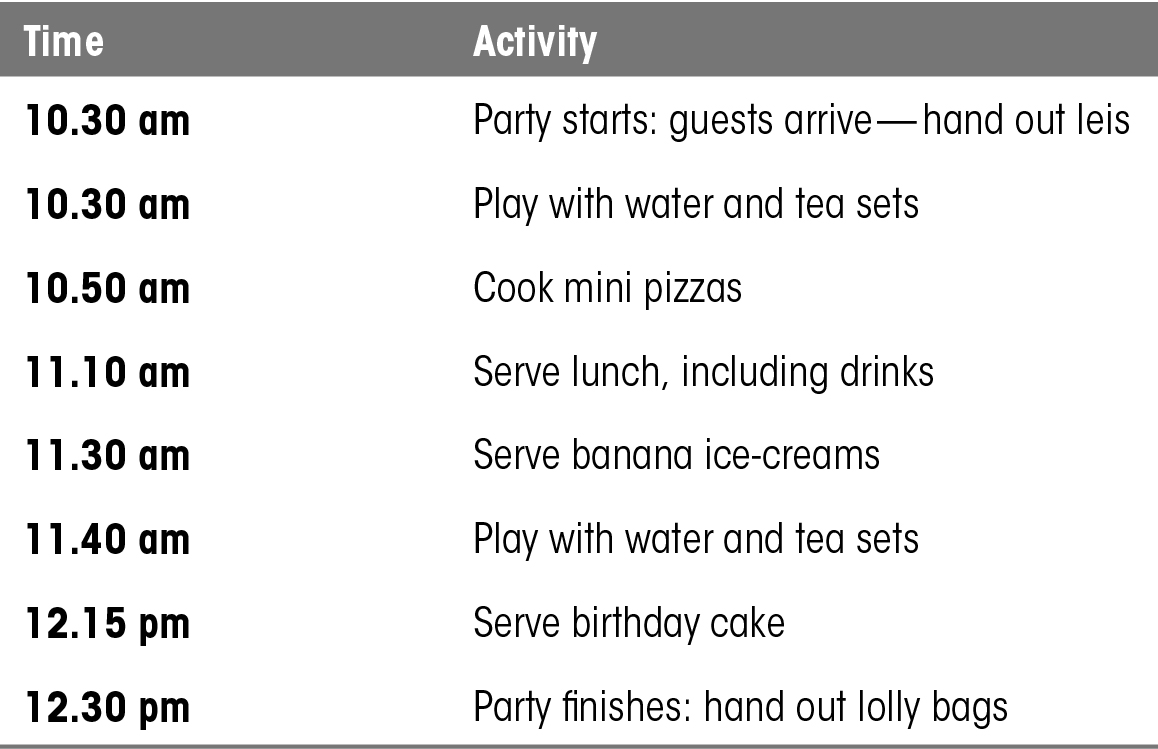
Party day timetable
The party day
timetable is really just for me. I enjoy it when our birthday parties
are relatively free-flowing for the kids, especially the little ones who
are not old enough for structured games. If things are flowing smoothly
and the kids want to stick with whatever they’re doing, I allow myself
to be led by the mood on the day of the party. By breaking down the
party preparation into discrete tasks, I have a clear idea of the work
that needs to be done and when. I find this particularly useful if I’m
serving hot food and it all has to be ready at the same time.
Another advantage of
having a timetable is that if you’re lucky enough to have some adult
helpers they refer to this list of tasks if they want to help out. My
sisters and close friends have always been fabulous at helping out on
the day of our kids’ parties. Having the list — which you can see in
table 5 — means that while I’m outside playing with the kids one of
my lovely sisters can do things such as putting the pizzas on at the
right time and keeping an eye on them so they’ll be ready in time for
lunch.
Table 5: party day timing
Step 9: Emergency plan
It’s
wise to have a Plan B if you’re having a party at home that involves
outdoor activities. Plan B can be very simple and low-cost.
Games such as musical statues, balloons and box construction can all be
great standby activities should the weather turn inclement.
One
year we had a football party planned for our six-year-old boy. It ended
up pouring with rain half an hour before the party was due to start. It
continued to pour rain for pretty much the whole party. Luckily, kids
are nowhere near as fickle as adults
about a little thing like rain so, with Dad out there refereeing, the
game went on. (Well, for 40 minutes at least, until the referee decided
that was enough!)
Plan A had been to play
round robin games of football, have lunch, play soccer-skills games,
eat cake and go home. We’d checked out the forecast and could see rain
on the horizon so Plan B was football, musical statues (I downloaded the
top 40 songs under direction from the kids, which they said were the
songs that ‘everyone at school liked’, even though they weren’t to my
taste!), lunch, inside balloon games (teams keeping the balloon off the
ground and popping a balloon to receive a lolly), eat cake and go home.
When
the rain became too heavy for the kids to play in, I was so relieved to
have a Plan B and the resources to implement it. With 18 seven-year-old
boys in the house, it could have otherwise ended up a bit wild.
Step 10: Thank-you cards
I started sending out
thank-you notes for children’s birthday parties when we moved to Surrey
Hills. It wasn’t the norm among my inner-city friends to do this, but in the
eastern suburbs it appeared to be, and I like the idea of the children
acknowledging and being grateful for the gifts they received.
The
thank-you cards can be very simple, using a similar design to the
invitation. Or, it can be a group photo of the party with a ‘thank you’
written on the back by you or your child.