Measure and combine all the ingredients
for either the Joy of Cooking or the Martha Stewart recipe into a
mixing bowl or the bowl of a food processor, cutting the butter into small cubes (½″ / 1
cm). You should preferably use pastry flour, but AP flour is okay. Chill in the freezer
for 15 to 30 minutes. Chilling the ingredients prevents the butter from melting, which
would allow the water in the butter to interact with the gluten in the flour, resulting in
a less flaky, more bread-like dough.
Pulse the ingredients in a food processor in one-to two-second bursts. Continue
pulsing the dough until the ingredients are combined into a coarse sand-like or small
pebble-like consistency. If you do not have a food processor, use a pastry blender, a
couple of knives, or your fingers to crumble the fats into the flour. Make sure if you use
your hands not to let the temperature of the dough rise much above room
temperature.
Once the dough is at a coarse sand- or pebble-like consistency, dump the dough out
onto a floured cutting board and press it into a round disc. Using a rolling pin, roll the
dough out into a sheet, then fold it over on itself and roll it out again, repeating until
the dough has been compressed and has enough structure that it can be transferred to a pie
tin.

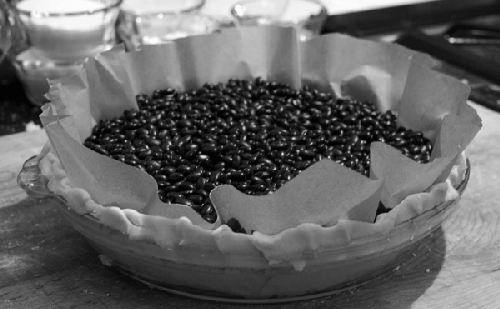
Some pies, such as lemon meringue pie , call for the pie shell to be prebaked. To
prebake a pie shell (also called blind baking), roll out the dough
and transfer it to your pie tin or mold. You’ll need to bake the pie with pie weights (no
need to be fancy—beans or rice work perfectly); otherwise, the pie dough will slide down
the edges and lose its shape. Once it’s baked enough to hold its shape, remove the pie
weights so that the pie shell has a chance to crisp up and brown. Set oven to 425°F / 220°C. Bake pie shell with pie weights for 15 minutes (use
parchment paper to separate the pie weights from the dough, so that you can pick up the
paper and remove the weights). Remove pie weights and bake for another 10 to 15 minutes,
until shell is golden brown.
Note: I hate the taste of uncooked flour; it burns the back of the
mouth. If you’re not sure whether your pie dough is done, err on the side of leaving it
in longer.
When prebaking—also called “blind baking”—a pie shell, make sure to fill
the shell with weights. Otherwise, the sides will collapse. Line the pie shell with
a piece of parchment paper or foil and fill it with dried beans or
rice.

|
I see from your online bio that you have a PhD in
organometallic chemistry. How did you get interested in chemistry in
cooking?My whole food interest is in no way related to my studies or my work, apart from
chemistry. It was when I was a student at the University of Oslo, almost 10 years ago,
that I found On Food and Cooking by Harold McGee in the faculty
library. It was very interesting.
The whole time, it’s only been a hobby. I’ve always liked cooking. Every chemist
should actually be a decent cook, because chemists, at least organic chemists, are very
used to following recipes. It’s what they do every day at the lab. I often tease my
colleagues, especially if they claim that they can’t bring a cake to the office for a
meeting, I say, “Well, as a chemist, you should be able to follow a recipe!” As a chemist,
I’ve always had, in a way, curiosity. I bring that curiosity back home into the kitchen
and wonder, “Why does the recipe tell me to do this or that?” That’s really the
case.
How has your science background impacted the way that you
think about cooking?
I think about cooking from a chemical perspective. What you do in cooking is actually
a lot of chemical and physical changes. Perhaps the most important thing is temperature,
because many changes in the kitchen are due to temperature variations. Searing meat and
sous vide are also good places to start. With sous vide, people gradually arrive at the
whole concept themselves. If you ask them how they would prepare a good steak, many people
would say you should take it out of the refrigerator ahead of time, so you temper the
meat. While you temper it, why not just put it in the sink—you could use lukewarm water?
Then if you take that further, why not actually temper the meat at the desired core
temperature? Most people will say that’s a good idea, then I say that’s sous vide. It
becomes obvious for people that that’s actually a good idea.
I’m very fascinated by the hydrocolloids. One of the reasons I spent so much time
putting the recipes together was that when I bought hydrocolloids, maybe one or two
recipes would be included, but I found them not to be very illustrative. Everyone is
familiar with gelatin, less so with pectin, but all the rest are largely unfamiliar.
People don’t know how they work, how you should disperse them and hydrate them, or their
properties. The idea was to collect recipes that illustrate as many of the ways to use
them as possible. You can read a couple of the recipes and then can go into the kitchen
and do your own stuff. That’s what I hope it will enable people to do.
I think it’s a fantastic recipe collection, having used it
myself for exactly the purpose that you describe. Out of curiosity, is there a favorite
hydrocolloid of yours?No, I haven’t even tried them all—I don’t have all of them in my kitchen.
Really?
I think the reason is more lack of time. With a full-time job, children, family...
there’s simply not enough time. It’s a lot easier to skip the practical part and
concentrate on the theory.
Is there a particular
recipe from which you’ve learned the most or found interesting or unexpected in some
way?
It’s hard to think of one recipe. When talking about molecular gastronomy, it’s easy
to focus too much on the fancy applications like using liquid nitrogen or hydrocolloids.
It’s important to emphasize that this is not what molecular gastronomy is about, although
many people think that; many people associate molecular gastronomy with foams and
alginate.
I always try to include basic things to get down to earth. One thing that comes to
mind is bread. It is really fascinating the great variety that you can achieve by using
only water, flour, and salt. With the flour and water, you already have the wild yeast
present, so you have everything set up for a sourdough. Then it depends on how you prepare
your starter, the ratios involved, how you proof your dough, and how you bake it. Of
course, this is not something new; bakers know this. But from a scientific viewpoint, it’s
very interesting to think about that. The no-knead bread illustrates a lot of chemistry;
you’re probably familiar with that?

I am, but go on.
Glutamine and gliadin, the two proteins that make gluten, can combine all by
themselves once you have a dough that is wet enough. The typical hydration for no-knead
bread would be somewhere in the 75% to 77% range. You bake the bread in a preheated pot,
where you simulate a steam oven. Moist air is a much better heat conductor than dry air,
and the moisture condenses on the surface of the bread. It enhances the crust formation
and helps the gelatinization of the starch. It also prevents the crust from drying out and
limiting the rise of the bread, so you get a much better oven spring this way. Once you
remove the lid, everything is set for the Maillard reaction as the crust dries out. So
there is a lot about both the way you make dough and the way you bake the bread that
exemplifies basic chemistry and physics.