The self-assessment
questionnaires in Tables 1 and 2
will help you determine the best format and configuration for your
family's checklists. Have each family member complete both
questionnaires. Keep in mind that, in the end, each person will be able
to have her own individual checklist that suits her personal style.
Table 1. Handwritten or Typewritten?
| | a | b |
|---|
| 1. If you are handed a page with both typed text and handwritten text, which text do you read first?
| | |
| 2. When someone sends you a thank-you note, which do you prefer receiving?
| | |
| 3. Do you hesitate to write changes or questions on a printed document?
| | |
Table 2. Indicating a “To Do” Is Done
| If you had your choice, which of the following methods would you use to indicate you had completed an item on a checklist? |
| • Check it off. |
| • Cross it out/draw a line through it. |
| • Delete it from the list. |
| • Highlight it. |
As you create your
checklists, you can make preliminary assignments of tasks to individual
family members based on each person's age and other obligations.
You'll determine
where you keep your lists and how you use them based on the formatting
option you select. Generally, you'll keep the checklists near your
family's planner, although as your family becomes more accustomed to
using the schedule, some members will take full responsibility for the
location and use of their own checklists.
If you answered more a's than b's, try using typewritten lists. Conversely, if you answered more b's than a's, try using handwritten lists, even if they are photocopies.
The questionnaire in Table 1
will help each person decide whether she responds better to words that
are typewritten or words that are handwritten. You'll find that by using
the kind of printing that carries the most weight in the user's mind,
you'll help her to focus on the message being conveyed by the list—that
is, what needs to be done. The added focus may be just the boost she
needs to actually do the job. |
Next, you need to find
an efficient way to present your checklists over and over again. After
all, you'll need 365 daily checklists, 52 weekly checklists, and 12
monthly checklists a year. Of course, several options are available,
each with its own set of plusses and minuses. The following sections
discuss these options in more detail.
Things You'll Need
Using Paper Checklists
Paper checklists can be
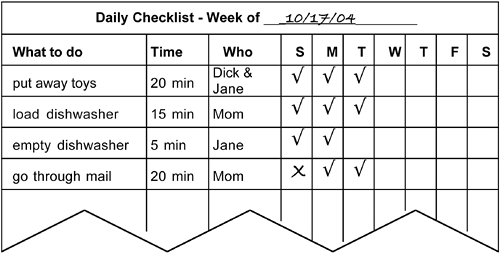
used only once. But you can design a daily checklist with enough check
boxes to last a week if you've chosen to check things off rather than to
cross them out or highlight them, as shown in Figure 1.
In a similar manner, you can place a month's worth of weekly checklists
on a single page. If you've chosen to use typewritten lists, you can
make a master list on your computer and then print off clean
copies—modified to include new assignments, if appropriate—as you need
them. If your family responds better to handwriting, you can save the
time of writing a new list every time you need a fresh copy by making
one original and then photocopying it. (The photocopied handwriting will
have almost the same force in the user's mind as an original
handwritten piece.)

caution
Some people think that
an advantage paper lists have over all of the other list media is that
they can keep them to refer back to if they ever want to see what and
how their family was doing at any particular time. However, you're
making these checklists for only the most routine of tasks—basically
chores—so the odds of your ever wanting or needing to look back are
slim. Even if you're a family-chronicle fanatic, keeping one blank copy
of each form should satisfy your yen to preserve your family's history.
Your ability to make
multiple copies of your blank checklists quickly and easily becomes even
more important if your family prefers crossing off or highlighting the
tasks as they're done. With those methods, if you're using paper
checklists, you have no choice but to have a separate list for each day,
for each week, and for each month.
Things You'll Need
tip
If your family is
color-oriented, you can give each person a different color pen to check
off, cross off, or highlight his accomplishments.
Using Laminated Checklists
Laminated checklists
are another hard-copy option. You can take a master copy of your
checklist and either laminate it yourself or have it laminated at your
local photocopy store. Then, using dry-erase markers, you can check off
or cross out each item as you do it. At the end of the day, week, or
month, as the case may be, you can wipe the list clean and start all
over again using the same list. A new erasable highlighter on the market
can be used on a laminated list, but the amount of highlighting
material to clean off will make this alternative rather messy. If you're
going to write in who is responsible for each task and you're going to
rotate among your family members, then remember to leave the assignment
blank on the master copy and fill in the names on top of the laminate
where they can be wiped off and changed.
note
Marks
made with the acid-free Duck Brand Dry-Lighter Highlighter can be
completely erased. Suggested retail: $5.99 for a three-pack.
|
Remember, those names will be handwritten, so if most people in your
family respond better to their names if they're typewritten, then this
option will not be ideal. |
Things You'll Need
Pen/pencil and 3×5-inch index cards, or Computer, Printer, and Microperforated sheets of 3×5-inch cards
A large magnetic surface
Small magnets
A file card box
File card dividers
Using 3×5 Cards
note
You
can create your own printed 3-by-5 index cards on your computer using
Avery Dennison's Laser & Ink Jet Index Cards (product #5388). They
come in packs of 50 sheets with 3 cards per sheet together with
templates for popular software programs. Suggested retail: $22.45.
|
Cards are the best
alternative for you if you want a hard-copy checklist where you delete
the task after you've completed it. You'll put just one to do item on
each card. Then you can assemble the checklist by posting all of the
relevant cards. A good system for this method that won't wear out is
hanging 3- by 5-inch cards with the tasks onto a large magnetic surface;
the refrigerator is a traditional choice.
Of course, you can write
on 3×5 index cards. If, however, you want typewriting on your cards, you
can get microperforated sheets of 3×5 cards that you can print on your
computer. Because the cards are reusable, you'll find that the amount of
time and effort to set up the system is worth the results. As each task
is completed, you can remove the card and place it back into a file box
or other holder so it's available to use again the next time you create
a list.
note
Oxford 3×5 manila Blank Index Card Guides come in packs of 100. Suggested retail: $5.95.
|
Because you'll have cards
for each day of the week and cards for each month of the year, a good
way to keep the cards that aren't posted currently is to use an index
card file box with dividers labeled with the names of the days and
months. You can make your own set using blank dividers.
tip
If you want to add
color-coding to your handwritten card system, you can use different
color cards to indicate which person is assigned the job, how often the
job needs to be done, or what day of the week the job should be done.
Things You'll Need
Using Digital Lists
A list on your
desktop computer will allow you to use any method to indicate task
completion. The easiest way to create a computer list that you can check
off is to use the checklist option for outlines in your word processor.
Or, if you don't have that option, you can simply type check marks in
front of the items on your list. You can cross items out by using the
strikethrough style in your word processor. You can highlight text
either by using a highlight option or by changing the text color of the
entry. And, of course, you can select a line of text and delete it if
you want to remove the completed task.
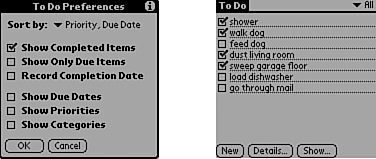
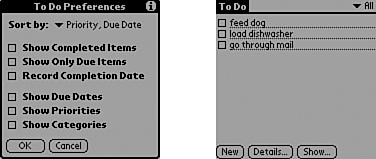
PDA checklists will work as long as you prefer checking off or deleting completed items. In Figure 2, the choice has been made to check off tasks as they're finished, whereas in Figure 3
the choice has been made to hide the finished items. Either way, the
complete list can be retrieved, so you can use it over again without
having to re-create it.


Comparing List Types
Table 3 gives you a quick reference guide to see which checklist formats will work with your family's preferences.
Table 3. Formatting Options for Checklists
| | Cross Out | Check Off | Highlight | Delete |
|---|
| Handwritten | Single-use paper
Laminated sheet | Single-use paper
Laminated sheet | Single-use paper
Laminated sheet | Cards |
| Typewritten hard copy | Single-use paper
Laminated sheet | Single-use paper
Laminated sheet | Single-use paper
Laminated sheet | Cards |
| Typewritten electronic | Desktop | Desktop PDA | Desktop | Desktop PDA |
Things You'll Need
Integrating Your Checklists with Your Planner
Now you're ready to finalize your checklists and integrate them into your planner.
No matter which form of checklist your family has chosen, you should include all of the following information on each checklist:
A description of the task
Your time estimate for the task
The name of the person responsible for completing the task
A check box (only if you've chosen the check-off method)
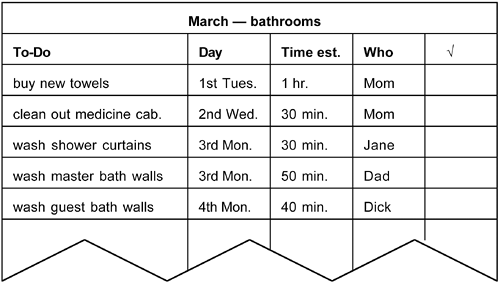
You'll find that your monthly checklists are easier to use if you put the tasks in chronological order, as shown in Figure 4, because the next step is to schedule enough time each day on your planner to complete the tasks listed for that day.

This process gives you another opportunity to fine-tune your time-specific lists:
If a task is
listed as a daily item but doesn't happen on a particular day, then you
won't schedule time for it on that day. An example would be going
through the mail, which you need to do daily, except on Sundays because
there's no mail delivery.
If
something seems to be missing or you notice that something is never
getting done, you can use that as an indicator that you should look back
and check whether you've listed it to be done at a good frequency—or
whether you've listed it at all.
If
you discover that some of your time estimates are unrealistic—either
too short or too long—adjust them to reflect reality. Encourage everyone
to continue to try to reduce the time each task takes by becoming more
efficient and proficient at it.
Your
family can decide to change the frequencies of tasks and who's assigned
to do them whenever you agree that a change is appropriate.