You don’t need to join a class to learn this
yoga sequence. Tune out and tone up in just 10 minutes with this effective
warm-up, stretch and workout for all your muscles and joints.
Sun salutation
Traditionally this combination of still and
flowing movements is a great way to wake up and energise the body and mind for
the day ahead. It may take a while to master the moves and breathing without
looking at the step-by-step guide below, but persevere – soon you’ll be doing
this routine on your own and enjoying all the benefits it offers.
Your
10 Min Total Body
Before you start
Wear comfortable, loose clothing and no
shoes. Use a yoga mat and stand on a level surface.
1.
Mountain pose
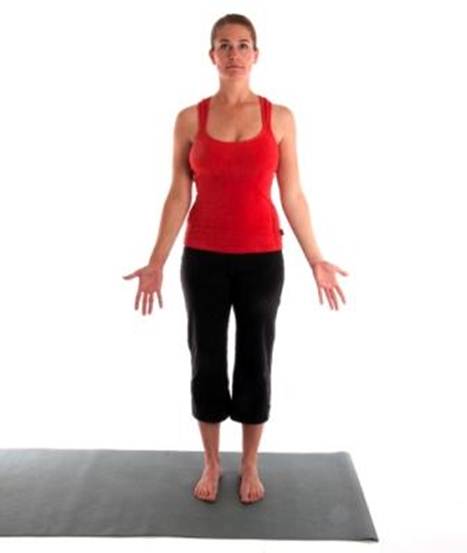
Stand tall with big toes touching, heels
slightly apart, shoulders relaxed, hands long at your sides, with fingers
stretched gently open, neck long, underside of chin parallel to the floor,
lengthen tailbone to the floor, and knee caps and thigh muscles lifted. Lift
your sternum without pushing your ribs out. Visualize yourself as a tall
mountain. Stay still in the pose while breathing in through your nose (mouth
closed) to the count of four and exhaling out to the count of four through your
nose (mouth remains closed).
2. Prayer pose
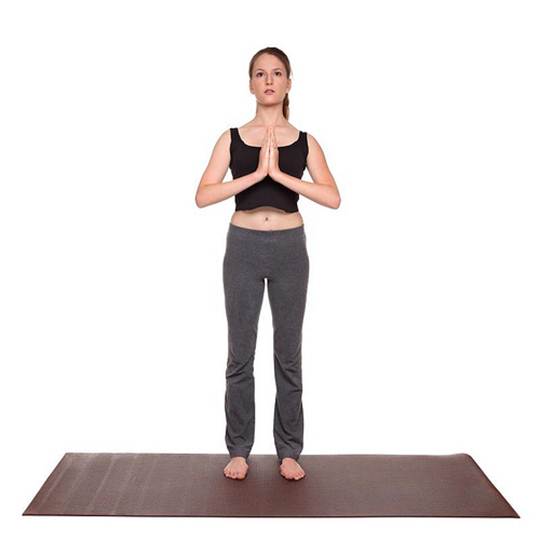
From mountain pose, slowly bend elbows and
place palms together in front of your chest. Relax your whole body. This
position establishes the concentration and calm you need to complete the rest
of the sequence, which consists of flowing positions. Each move follows the
next and it’s very important to connect each with an inhalation or exhalation.
3. Raised arms pose
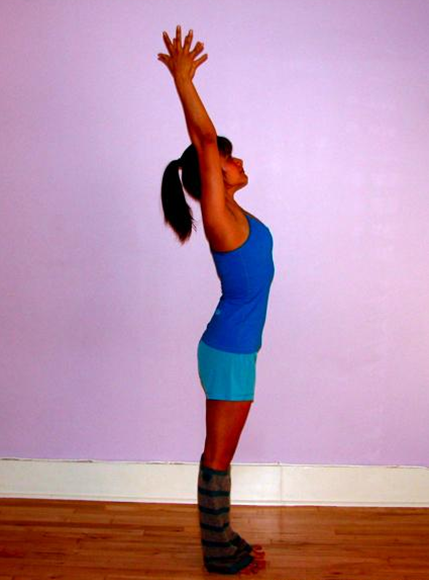
As you inhale, raise and stretch both arms
above your head. Keep palms together, open your chest so your upper trunk
arches back slightly, keep shoulders down, head releasing back slightly. You’re
now stretching your abdomen and expanding your lungs, exercising your arms and
shoulder muscles and toning the nerves in your spine.
4. Hand to foot pose

As you exhale, bend forward touching
fingers or palms to the floor on either side of your feet. Try not to bend your
knees, but don’t strain. Pull your tummy in as you bend. If you have back
problems, bend from the hips with a straight spine or only as far as is
comfortable. This pose aids digestion, tones the abdomen and improves
circulation.
5. Equestrian pose
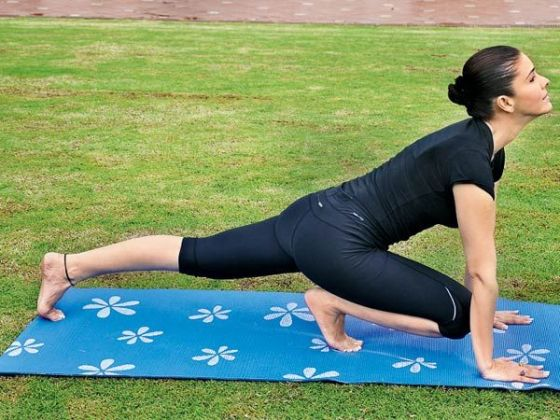
As you inhale, place palms flat on floor
beside feet as you stretch the right leg back as far as possible and bend the
left knee, keeping the left foot on the floor in the same position. Keep arms
straight, support your body weight with both hands, left foot, right knee and
toes of right foot. Arch your back slightly and open your chest and neck. This
pose strengthens leg muscles and regulates the nervous system.
6. Plank pose
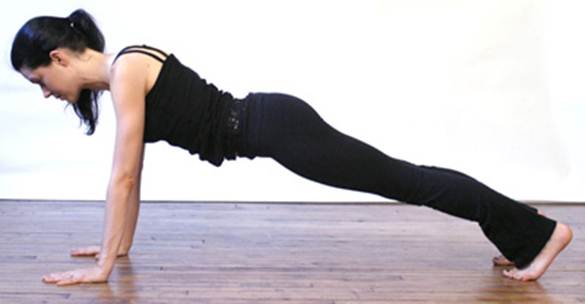
As you exhale, step the left leg back into
a plank position. Keep spine and legs in a straight line and support your
weight with your hands and feet.
7. Transition pose
Lower your knees, chin and chest
(simultaneously if possible or one after the other) to the mat, bending your
elbows so they point upwards at a 45o angle behind you. Release your
feet onto the mat. This position strengthens arms, legs, chest and shoulder
blades.
8. Cobra pose
As you inhale, lower your buttocks to the
floor, straighten your elbows, arch your back and push your chest forward,
pulling gently on your hands ( which are flat on the mat, fingers spread). The
cobra pose keeps your spine supple, improves circulation, tones various
internal organs and spinal nerves.
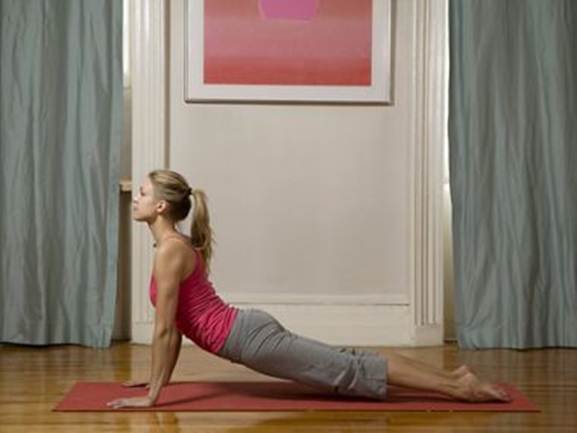
9. Downward dog pose
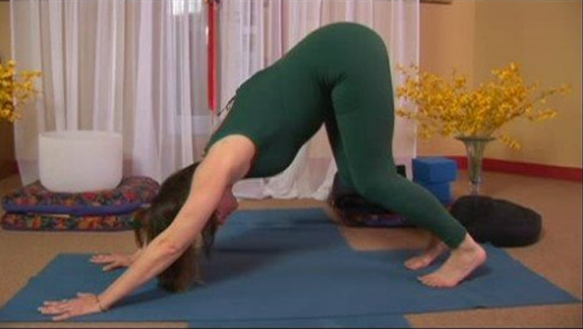
As you exhale, take the left foot back to
join the right, raise your buttocks and lower your head between the arms so
your back and legs form a triangle. Try to keep your heels on or moving towards
the floor, lengthen your back, spread your hands on the mat and press down
gently into your palms.
10. Equestrian pose
As you inhale, repeat pose 5, but this time
bring your left leg forward between your hands and leave your right leg
stretched out behind you.
11. Hand to foot pose
As you exhale, repeat pose 4
12. Raised arms pose
As you inhale, come up and repeat pose 3,
fanning your arms up until your arms touch.
13. Prayer pose
As you exhale, lower your arms, palms still
together into this final position, which is the same as pose 2.