This simple mashed potato recipe
uses the microwave for cooking the potatoes. If you’re in the anti-microwave category,
consider this: cooking a potato—or any other starchy root vegetable—requires
gelatinizing the starches in the vegetable. For this to occur, two things need to
happen: the starch granules need to get hot enough to literally melt, and they need to
be exposed to water so that the granules absorb and swell up, which causes the texture
of the tissue to change. Luckily, the temperature at which most starches undergo the
gelatinization process is below the boiling point of water, and there’s enough water
naturally present in potatoes for this to happen without any intervention needed. Try
popping a sweet potato in your microwave for a few minutes—fast, easy, and
healthy!
Microwave until cooked, about six minutes:
3 to 4 medium (600g) red potatoes
After cooking, cut the potatoes into small pieces that can be mashed with the back
of a fork. Add and mash together:
½ cup (120g) sour cream
⅓ cup (85g) milk
4 teaspoons (20g) butter
2 teaspoons (2g) finely chopped fresh rosemary
leaves
¼ teaspoon (1g) salt (2 large pinches)
¼ teaspoon (1g) ground pepper
Notes
For a tangy version, trying substituting plain yogurt for a portion of
the sour cream.
Different types of potatoes have different amounts of starch.
Varieties with high starch content (e.g., russets, the brown ones with rough skin)
turn out lighter and fluffier when baked and are generally better for baked or
mashed potatoes. Lower-starch varieties (red or yellow potatoes, typically smaller
and smooth-skinned) hold their shape better and are better suited for applications
in which you want the potato to stay intact, such as potato salad. Of course,
there’s still a lot of room for personal preference. When it comes to mashed
potatoes, I prefer a coarse texture to the creamy, perfectly smooth potatoes so
often seen in movie scenes associated with Thanksgiving, so I tend to use red
potatoes.
Aki Kamozawa and Alex Talbot write
about their experiences with food on their blog (http://www.ideasinfood.com). A husband-and-wife team, they met while
working at one of Boston’s premier restaurants, Clio, in 1997, and in recent years
have run their own consulting business, educating chefs in new techniques and creative
ideas.

How has having the blog changed your
cooking?
It made us more meticulous about paying attention to what we were doing and
recording recipes. People would constantly ask us questions, so we needed to have a good
answer. Just throwing things in a pan and trying to explain that to someone else really
didn’t work. Also, we get questions about a lot of different techniques, I think because
we work with a lot of chefs. They’re more interested in how things work than they are
with specific recipes.
Where does the inspiration for some of the more unusual
approaches you blog about come from, such as using liquid nitrogen to freeze and
shatter beets?
When you have stuff in your kitchen and you’re working with it, you just try. You
try to figure out what you can do with it and what’s possible. With liquid nitrogen,
back in science class they did the demonstration where they put the ball in the liquid
nitrogen and then smashed it. So when you have it in your own kitchen, you try to break
everything with it.
What advice would you give somebody who wants to learn to
cook?
Really just to get in there and start cooking and not be afraid to fail. You
probably learn more from failure than you do from success because when something goes
right you don’t really think about how you did it or why it worked. But when something
goes wrong and you have to fix it, then you learn a lot more about what’s
happening.
Why do you think people have a fear of failure in the
kitchen?
Because they have a fear of failure in life. Nobody wants to fail. Most people who
are cooking at home and trying a new recipe are usually cooking for someone else. And if
you screw up in the kitchen, it’s expensive—to ruin a whole thing of food and then you
don’t have anything to eat? You have to have a sense of humor in the kitchen. You have
to be able to laugh at yourself. You can always order a pizza.
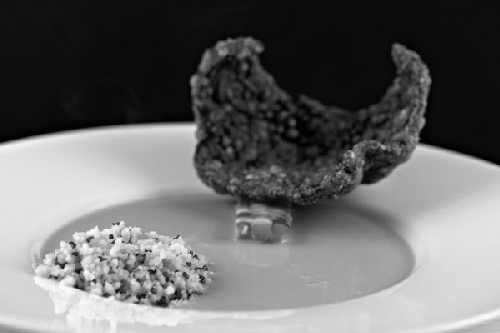
Sweet Corn and Miso Soup
Cleaned squid
3 pounds (1360g) whole squid
Separate the heads and bodies of the squid. Rinse the bodies under cold water to
clean the interior and exterior. Remove the cartilage piece from inside each squid body.
When the bodies are clean, pat dry and reserve in the refrigerator. Rinse the squid
heads under cold water to remove any gritty material. Lay each head on a cutting board
with the tentacles extending to the left. Cut the eyes and interior beak off the
righthand side of the head. Discard the beak and eyes. Reserve the tentacles in the
refrigerator.
Calamari
crackling
~⅔ cup (145g) cleaned squid tentacles
~⅓ cup (80g) cleaned squid bodies
1 teaspoon (5g) squid ink
2½ cups (260g) tapioca flour
6½ cups (1.5 liters) canola oil for
frying
Salt
Purée the squid tentacles, bodies, and ink in a food processor until it forms a
smooth paste. Add the tapioca flour and pulse the mixture to evenly combine the tapioca
into the squid paste. Turn the machine on and purée the mixture to form a sticky dough.
Divide the dough between two large vacuum bags and seal on high pressure.
Use a rolling pin to spread the dough to the inside edges of the bag so that a
uniform thickness is achieved. The dough should be about 1/10″ / 2 mm thick. Place both
bags in a steamer large enough to hold them and gently steam the dough for 25 minutes.
After 25 minutes, remove the bags and cut them open. Carefully pull the dough out of the
bags and lay it on dehydrator trays.
Dehydrate the sheets for several hours until the dough is completely dry and
brittle. The dough will take on a shiny matte appearance. When the dough is dry, remove
it from the dehydrator and break the sheet into pieces roughly 1½″ / 4 cm wide and 3″ /
8 cm long. This recipe makes more calamari crackers than are needed for the dish. You
can reserve the dried cracker base in its dry form in a zip-top bag for several
weeks.
In a medium-sized pot, heat 6 cups (1.5 liters) of canola oil to 350°F / 177°C.
Slide the crackers two at a time into the oil. The crackers will sink to the bottom of
the oil and then begin to puff and expand. Fry the crackling until it is completely
puffed and there are no dark spots of unexpanded cracker dough. Remove the puffed
cracklings from the oil and drain on a paper-towel-lined tray. Sprinkle with salt while
still hot from the fryer.
Calamari couscous
~3½ cups (725g) cleaned squid bodies
5 cloves (20g) fresh garlic
Use a microplane grater to zest the garlic. Place the zested garlic and the cleaned
squid bodies in a food processor. Purée the mixture into a coarse paste. When the
mixture takes on a creamy texture and is almost homogenous, stop processing.
Heat a large, nonstick pan on medium heat. When the pan is heated, add the squid
mixture. Stir the squid paste in the pan and continue to cook. The mixture will begin to
stick to the pan. Use a heatproof rubber spatula to scrape the bottom of the pan and
keep the mixture from sticking.
Continue to cook and stir the mixture. The squid will begin to lose its creamy
texture and begin to firm up and form small squid pieces, which will resemble cooked
sausage. As the squid continues to cook, it will exude liquid. Continue to cook the
squid, allowing the moisture to evaporate until the mixture is dry.
Remove from heat. Place the squid in a shallow pan sitting on an ice bath to cool it
quickly. When the cooked squid is cold, place it a food processor. Pulse the food
processor to chop the squid nuggets into fine granules resembling couscous. Reserve the
calamari couscous in the refrigerator.
Broiled corn planks
8 ears of corn, with husks
Lay the corn out on a sheet tray and broil on high heat for five minutes on each
side. The husks will blacken. Keep watch over the corn to make sure that they do not
catch on fire. Let the corn cool on top of the stove for 10 minutes.
Peel the husks and the silk from the corn. Cut each piece of corn in half. Stand
each piece up vertically on the cut end and, using a sharp knife, slice the kernels away
from the cobs. They will come away in large pieces and loose kernels. Set aside the 16
largest chunks.
Cut the large pieces of corn into planks ¾″ / 2 cm wide and 2″ / 5 cm long. The
width may be adjusted so that the planks are three kernels wide. Place on a small plate
or tray, cover with plastic wrap, and place in the refrigerator. Reserve the trim with
the rest of the corn kernels in a covered bowl in the refrigerator. Reserve the cobs for
corn stock.
Corn stock
8 corncobs
½ cup (150g) white miso paste
~2 cups (250g) sliced onion
6½ cups (1.5 liters) water
Cut the top tip and bottom end off each corncob and discard. Cut each corncob in
half. Combine the corncobs, miso, onion, and water in a 6-quart pressure cooker. Cook at
high pressure for 25 minutes. Allow the pressure to dissipate naturally.
Alternatively, combine all ingredients in a heavy-bottomed pot and bring to a simmer
over medium heat. Cook for one hour, skimming as needed. Remove from the heat, cover,
and let steep for 30 minutes. Strain the finished stock through a fine mesh conical
strainer. Chill and reserve until needed.
Prepare the corn soup:
5 cups (1150g) corn stock
~7 cups (975g) broiled corn
⅔ cup (200g) white miso paste
Combine the cold corn stock and miso in a bowl and whisk gently to blend. Add the
broiled corn. Transfer batches of this mixture to the blender. Purée each batch until it
is completely smooth. Strain the soup through a fine mesh conical strainer. Refrigerate
the soup in a covered container until needed.
Sliced chives
1 cup (50g) chives
Slice the chives into very thin (1 mm) rounds. Reserve.
Assembly
Place the soup in a large pot and gently bring to a simmer, stirring occasionally.
Place the corn planks in a sauté pan over low heat and spoon several spoonfuls of warm
soup over the planks. Gently cook until the planks are heated through, flipping once to
make sure the top and bottom are both hot. In a small pot, heat the calamari couscous.
Stir occasionally to prevent the couscous from sticking. When the couscous is hot, fold
in the sliced chives.
In each bowl, stack two of the corn planks at the nine o’clock position extending
into the center of the bowl. Spoon two spoonfuls of the calamari couscous on the inside
edge of the bowl at the five o’clock position. Pour the soup into the bowls, leaving the
second half of the top corn plank exposed. Place a calamari crackling on the edge of the
bowl and the corn planks so that the corn planks are partially exposed and the crackling
rests between the edge of the bowl and the corn planks. Serve immediately.